Today I decided to start baking my own sandwich bread. I spent many years as a pastry chef and have baked breads before, but oddly enough, never sandwich bread. It's a terribly easy whole wheat bread, with a little o.j. and molasses, and NO sugar.I think my little loaf of bread turned out pretty darn good. Still waiting for it to cool before slicing.
Here's a link to the recipe I used, and actually followed to the letter which is something I don't always do.
http://www.kingarthurflour.com/recipes/no-knead-100-whole-wheat-bread-recipe
King Arthur has LOTS of yummy baking recipes - the apple pie sounds delicious.
I've taken several photos of my process for making papier mache jewelry and hope you enjoy seeing a little behind the scenes.
Sunday, October 10, 2010
Sunday, August 22, 2010
Papier Mache Necklaces using markers, paint, and varnish
With my first batch of papier mache, I allowed the varnishing to help create the finish. It blended and swirled the colors into something very nice to look at. With these beads I used permanent markers and silver and gold metallic ink markers. Here are a few examples:
I've a new batch of papier mache (see photo's from first post) and these pieces are less pebble-like, the round beads are more uniform, and I've experimented with a few different shapes. Initially, the necklace below was going to be made into a wind chime or mobile (using several discs instead of just these two), but I put a couple of the discs together and really loved the way it looked as a necklace.
Here are a few pictures of the necklace. After the painting had dried, I very, very lightly applied a varnish with a soft brush, and the design and colors remained intact. I now believe a safer approach would be to use an artists fixative prior to the varnish. I'm curious to see if there's a difference - I'll be sure to share the photos.
Wednesday, August 18, 2010
From Paper to Pulp, to bead, bowl, and chime
 |
| Shreds of recycled paper that have been soaking in water for 24+ hours. I usually get this from someone nice who has a shredding machine and is really happy to give it away. |
 |
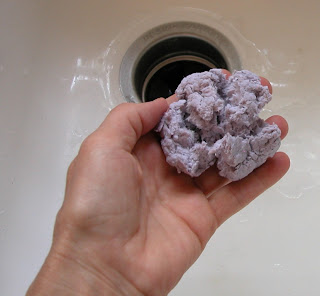
| Here, I've squeezed out the excess water. |
 | |
| Water squeezed out, but prior to adding the papier mache paste. |
 |
| Here is my paste. Essentially it's flour, sugar, and hot water. I've added lemon and wild cedarwood essential oils to serve as preservatives. |
 |
| Here are beads that I've hand rolled. I have a dehydrator and really love the time saved by using it to dry my pieces. The beads above and chimes below are already dried. |
Subscribe to:
Comments (Atom)


